For VAN's help docs on Launching a Robocall, please visit: https://help.ngpvan.com/van/s/article/1669252-launching-robocall-robosurvey.
For our walkthrough documents, please continue scrolling below:
Step 1: Create your desired list, click 'Calls' in 'My List, and 'Set up Robocall Using Callfire':

Step 2: You will be taken to a new screen to create a 'New Robocall'. Name the call, provide a caller ID number (you can use either a cell or landline), hit next, and you will be given a number to call to verify you/the campaign has access to the number. Once that is done, click 'Next'.
 Step 3: Select the Live and Answering Machine Recording you want to use, or add one. After those are in, click 'Next'.
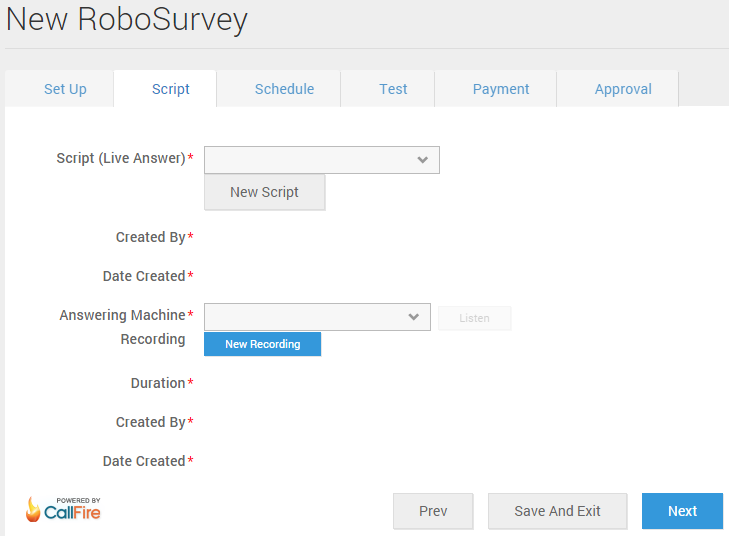
Step 4: You will now be able to schedule the call, including date, start and stop time. From previous experiences, the robocall system can call about 1000 numbers per hour. Please keep this estimate in time when scheduling your calls. Once scheduled, hit 'Next'.

Step 5: After you schedule your call, you can test the call quality by calling a test number. Please note that a test number must be a LAND LINE. However, if you are certain the recording is good to go, you can proceed to the payment screen by clicking next WITHOUT needing to send a test call.

Step 6: To pay for your call, please select a Robocall Account, which can be found under 'Phone Services --> RoboCall Accounts'. To make the set up easier, please use the RoboCall Accounts section in Phone Services to add money to the account. Once you have selected an account on the screen below that has money, you hit 'Next' to approve the call.

Step 7: On the approval screen, you will receive an overview of the calls set up and will be asked to agree to Terms and Conditions. Once you have done that, and clicked 'Finish' the Robocall will be scheduled to begin at your designated time.